
RMS900-108164 | 900W SPLYT Stator + Regulator + Dual Battery Isolator + Flywheel + Puller + Gasket for Polaris RZR Ranger 2013-2022 |
Original price was: C$1,119.00.C$1,119.00Current price is: C$1,119.00.
Dual Stator Dimensions
Interior diameter : 53 mm
Exterior diameter : 125 mm
Thickness : 26 mm
Length of wires stator to grommet : 125 mm
Length of wires grommet to plug : 290 mm & 550 mm
Other specifications :
Number of wires : 6
Number of plugs : 2
Number of pins : 6
Number of poles : 18
Wire to wire resistance :
Alternator: Yellow/Black to Yellow/Black = 0.5 ohms +-20%
Regulator Dimensions
Width: 84 mm
Length: 90 mm
Height: 32 mm
Fixation holes center to center: 69 mm
Other specifications:
Number of plugs: 2
Number of pins: 5
Minimum Charging Voltage: 14.5 V +- 0.5 V
Maximum Charging Current: 50 A / 500 W
Open Circuit Voltage: < 15 V
Operation Temperature: -20º to 85º
Relocation Harness Dimensions
Wires length : 2400 mm
Number of yellow wires : 3
Number of red wires : 1
Number of black wires : 1
Number of plugs : 2
Complete Dual Battery Isolator Connection and Metering Kit
- Dual battery isolator relay
- 12” Black ground battery cable with terminal lugs
- 12” Red positive battery cable with terminal lugs
- 18” Red positive battery cable with terminal lugs
- Dual Red LED voltmeter (1.4” OD x 1” depth)
- Keyswitch voltmeter activation relay with socket and wires
- 96” wire harness for dual voltmeter connection to relay
- Terminals and connectorsFlywheel Dimensions:
Exterior Diameter: 140.6 mm
Interior Diameter: 127.8 mm
Interior Diameter Center Housing: 22.4 mm
Exterior Diameter Center Housing: 50 mmFlywheel Puller Dimensions:
Length: 40.6 mm
Exterior Diameter: 57 mm
Interior Diameter: 48.3 mm
Exterior Diameter Center Housing: 20 mm
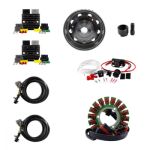
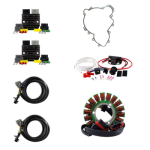
This kit includes:
- Dual output stator
- Flywheel
- Flywheel Puller
- Two SERIES voltage regulators
- Two automotive grade relocation wiring harnesses with OEM-quality heavy-duty connectors
- Complete instructions for voltage regulator relocation
- RMSTATOR UTV Complete Dual Battery Isolator Connection and Metering Kit
- Gasket
RMSTATOR UTV Complete Dual Battery Isolator Connection and Metering Kit
As modern UTV’s are improving every year, it is increasingly common to add accessories to them like stereos, lights, and winches. These are great upgrades, until you are stuck with a dead battery and can’t start the engine! RMSTATOR comes to the rescue with the best and most complete kit available to add a second battery to your UTV to power your accessories and monitor the charge of both batteries right from your dashboard!
The addition of a second battery to your vehicle to power your accessories allows you to safely use them all day without discharging your primary starting battery. If the voltage drops too low on your second battery, it will disconnect and isolate it from the main battery safely and automatically. When the motor is started, the secondary battery will be reconnected and recharged.
Our included LED dual voltmeter installs on your dashboard, and lets you easily monitor the voltage of both batteries. The included wiring harness and relay allow the voltmeter to turn on and off with your keyswitch.
Everything you need for a complete installation is included!
Includes:
-
- Dual battery isolator relay
- 12” Black ground battery cable with terminal lugs
- 12” Red positive battery cable with terminal lugs
- 18” Red positive battery cable with terminal lugs
- Dual Red LED voltmeter (1.4” OD x 1” depth)
- Keyswitch voltmeter activation relay with socket and wires
- 96” wire harness for dual voltmeter connection to relay
- Terminals and connectors
-
Removing a Powersport Vehicle’s Flywheel / Rotor:
How it Works
Flywheel Pullers are very versatile engine service tools and are a must in every toolbox. Our large selection of best selling rotor and flywheel pullers fit just about any motorcycle or ATV. Flywheel pullers are very simple to use, having only an outer body to hold the flywheel and a screw to push on the crankshaft. Some are even simpler, having only a bolt to thread into the flywheel. A taper holds the flywheel or rotor and the crankshaft together. The flywheel is secured to the shaft by applying torque to the fixing bolt.
An Important Component to use
Many flywheel or rotor puller tools will include a small cap. This is a crankshaft thread protector, and should always be used if it is included with the puller. You slip this cap onto the end of the inner piece of the puller which presses against the tip of the crankshaft. This keeps the fine threads from being stripped or damaged while removing the flywheel or rotor.
Actions to Avoid
Most of the time, removing a flywheel or rotor is painless. But sometimes corrosion, over-torquing the fixing bolt, or heat-cycling can give you a hard time removing the flywheel. We too often see mechanics use a larger breaker bar or air impact tools to ease the flywheel off. These two techniques will damage the flywheel, the flywheel puller, or the crank. Avoid using them if you want to keep it cheap.
Tips to break a stuck flywheel loose:
Torque Wrench
How do you know if it’s stuck? You simply have to set your torque wrench to 50 ft-lbs and try to ease the flywheel off. If the flywheel is not stuck, you should be able to remove it with even less torque than this. If it is stuck, don’t use more torque or you might break your wrench.
Ball Peen Hammer
If 50 ft-lbs does not do the trick, go fetch something like a 12 or 16 oz ball peen hammer. Hit the end of the flywheel puller with a medium blow. Many times, the shock you create will successfully remove your flywheel. Be prepared to catch the flywheel since the shock of the hammer can make the flywheel jump off. Once again, getting into that situation will be pricey. And don’t forget your safety glasses.
Propane Torch
The hammer is not a be-all, end-all solution. Sometimes, you will have to find something more powerful, and that’s where the propane torch comes in. As a last resort solution, the heat should expand the flywheel but not the crank, since it is too massive to expand as fast. That way, the flywheel will become looser and will come off easier.
Important Security Tips: In order to not set fire to your garage, your vehicle, or yourself, certain precautions are necessary prior to heating the flywheel:
- Clean any oil or flammable liquids off the flywheel;
- Make sure your work area is free of any flammable liquids and that you work in a well ventilated area;
- Make sure to remove the gas tank, and set it aside at a safe distance.
Make sure the flame of your torch is focused, and heat only the center of the flywheel. This is due to the fact that some flywheels use adhesive or other fixing compounds to locate the magnets in the rim that can be damaged by concentrated heat. Here again, the wheel might fall off the crank, so be prepared to catch it. And remember that you just heated it, so make sure you can catch it without burning yourself.
With these tips and techniques, you are now equipped to handle any stuck flywheel without throwing your flywheel puller at it; unless you have a habit of working with machines that have been in a lake for months!
| Weight | 2.95 kg |
|---|---|
| Brand |
RMSTATOR |
| Fitment Type |
Guaranteed Fit |
OEM AND OTHER PART NUMBERS
OEM NUMBER
- 108164-R00, 108164.R00, 108164 R00, 108164R00
ADDITIONAL NUMBER
- RMS900-108164
DO NOT MANUFACTURE PARTS, DESIGN PERMANENT SOLUTIONS
We cultivate our actions towards finding permanent solutions. There is no way, us, as customers, would like to replace a part again and again. This mindset forces our team to design to fix, to conquer these pesky electrical failures in powersport.
GOOD DESIGN PRODUCE GOOD PRODUCTS. EFFICIENT DESIGN CREATES STELLAR PRODUCTS.
We are committing to innovate in finding clever ways to design more efficient parts that produce better results than any other part on the market.
WE ALL ARE CUSTOMERS ELSEWHERE.
In our shopping journey for buying our daily goods, we all expect to be treated with respect in a relation that makes us feel welcomed. Our team is encouraged to elevate that standard even higher and to provide all the information necessary for an easy and reliable installation.
OWN YOUR CUSTOMER PAIN LIKE IT IS YOURS
We own powersport rides ourselves. We feel the pain of dealing with unsolvable troubleshooting on our rides. We are committed in manufacturing complete solutions to known or I-would-never-have-suspected issues that are plaguing your rides... and ours.